How To Sterilize Sinus Rinse Bottle In Microwave: Guide
Microwave sterilize a sinus rinse bottle by steaming it with water for two to three minutes.
I’ve cleaned hundreds of nasal irrigation kits and tested a range of methods. If you want clear, practical steps on how to sterilize sinus rinse bottle in microwave, you’re in the right place. This guide gives safe, step-by-step instructions, real-life tips, and the key warnings you need. I will explain when microwave sterilizing works, when it doesn’t, and how to avoid common mistakes. Read on to get confident and safe results.

Why sterilize your sinus rinse bottle?
Sterilizing keeps germs out of your nose. A clean bottle cuts the risk of infections and sinus irritation. Saline alone won’t kill all microbes that can grow in a damp bottle. Regular sterilization keeps your rinse safe and fresh.
People often ask how to sterilize sinus rinse bottle in microwave because it is fast and easy. Microwave steam can disinfect if done right. But not all bottles are safe for microwave use. Always check the bottle label and your rinse kit instructions.
Is microwave sterilization safe for sinus rinse bottles?
Microwave sterilization is safe for microwave-rated plastics and for glass bottles. It is not safe for bottles with metal parts or electric components. If the bottle label says "microwave safe," you can proceed carefully.
Microwave sterilization uses steam heat. Steam kills many microbes quickly. Power levels and duration matter. If you are unsure, choose boiling water or a dishwasher sanitize cycle instead.

Step-by-step: how to sterilize sinus rinse bottle in microwave
Follow these clear steps to microwave-sterilize a rinse bottle safely.
- Disassemble
- Remove cap, nozzle, filters, and any removable parts. Leave out non-plastic parts.
- Wash first
- Use warm water and mild soap. Scrub the bottle and all parts with a bottle brush. Rinse well.
- Inspect materials
- Confirm the bottle and parts are labeled microwave safe. If not, do not microwave them.
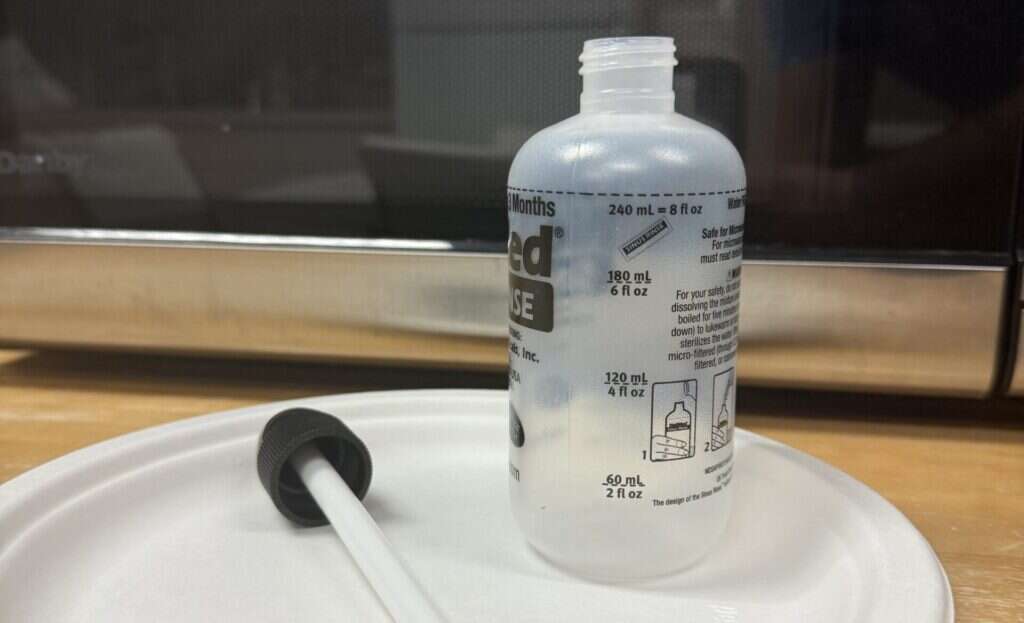
- Prepare for steaming
- Fill the bottle halfway with clean water. Place the cap off or set it beside the bottle. Put parts in a microwave-safe bowl with water.
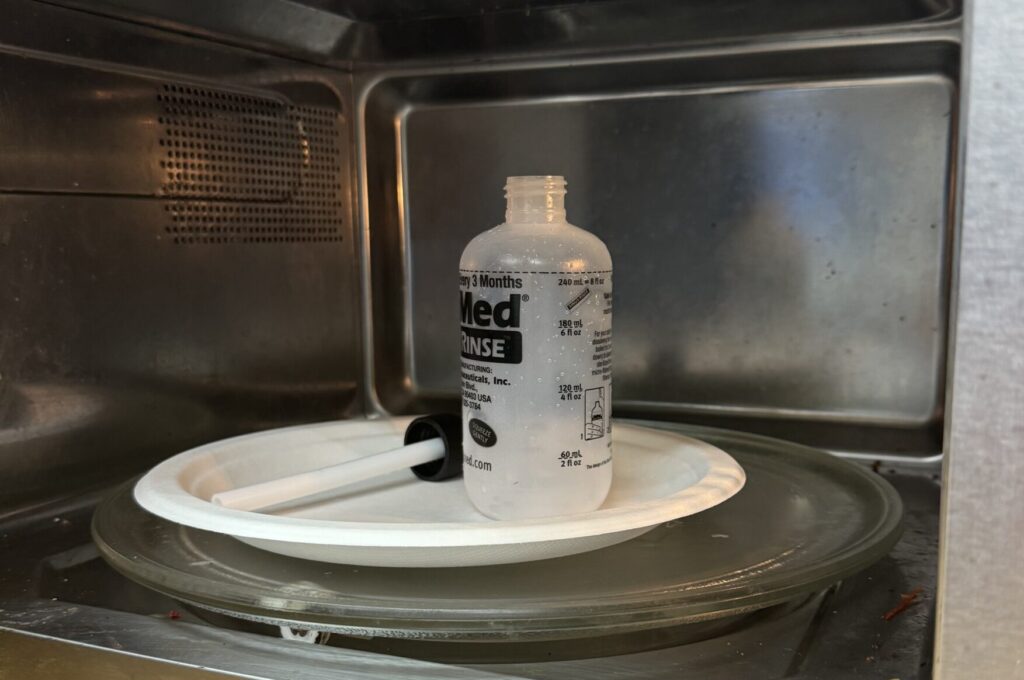
- Microwave carefully
- Place the bottle upright in the microwave. Heat on high for 2 to 3 minutes. If your microwave is low power, heat for up to 4 minutes.
- Let cool and dry
- Let the bottle sit in the microwave for 2 minutes to cool. Carefully remove and dump the water. Air-dry on a clean towel or rack before reassembly.
I learned the hard way to always leave caps off. A sealed bottle can burst from steam pressure. Also, never microwave the saline solution inside a sealed bottle.

Best practices and safety tips
Use these tips to avoid damage or injury when you microwave your bottle.
- Always check manufacturer instructions before microwaving. Follow their advice over general tips.
- Never microwave closed containers. Steam must escape to prevent explosions.
- Avoid bottles with metal parts, batteries, or electronic elements. Those can spark.
- Use microwave-safe sterilizer bags if available. They make the process cleaner and simpler.
- Replace old, warped, or scratched bottles. Surface damage can hide bacteria and weaken plastic.
- For babies or immune-compromised users, prefer single-use devices or professional advice.
A few times I shortened the microwave time and the bottle still smelled. That taught me to follow full times and to dry parts completely.

Alternatives to microwave sterilization
If microwave sterilizing is not an option, these alternatives work well.
- Boiling water
- Immerse the disassembled bottle and parts in boiling water for 3 to 5 minutes. Let cool and dry.
- Dishwasher sanitize cycle
- Use a high-heat sanitize cycle if the bottle is dishwasher-safe. Place small parts in a mesh bag.
- Sterilizing solution
- Use a diluted bleach or hydrogen peroxide solution per safe dilution guidelines. Rinse thoroughly after.
- Steam sterilizer
- Use a baby bottle steam sterilizer that lists the device as safe for your bottle type.
Each method has pros and cons. I prefer boiling for glass bottles and steam bags for quick travel.

Maintenance routine and frequency
How often you sterilize depends on use. For daily irrigators, sterilize at least twice a week. If you are sick, sterilize after each use. Store the bottle dry and in a clean place between uses.
Daily quick care:
- Rinse and air-dry after each use.
- Wash with soap and water nightly.
Weekly deep care: - Sterilize by microwave, boiling, or dishwasher once or twice per week.
I keep a small checklist by my sink. It helps me stay consistent and avoid missed cleanings.

Frequently Asked Questions of how to sterilize sinus rinse bottle in microwave
How long do I microwave a sinus rinse bottle?
Microwave for 2 to 3 minutes on high for most small plastic bottles. If your microwave is low wattage, increase to 3 to 4 minutes. Always keep the cap off to allow steam to escape.
Can I microwave a squeeze bottle with a filter?
No. Remove and do not microwave any filters or parts that are not labeled microwave-safe. Filters can be damaged or produce harmful fumes.
Is boiling better than microwave sterilization?
Boiling is a reliable alternative and works for many materials. Use boiling if the bottle is not microwave-safe or if you prefer a proven method.
Will microwaving ruin BPA-free plastic?
High-quality BPA-free plastic made for microwaves should survive repeated steaming. However, watch for warping or discoloration and replace the bottle if it shows damage.
Can I microwave the saline solution inside the bottle?
Do not microwave saline in a sealed bottle. Heat can change salt concentration and create hot spots that burn tissue. Always use sterile or boiled water cooled to room temperature.
Conclusion
Microwave steam is a fast and effective way to clean many sinus rinse bottles when done correctly. Check your bottle’s label, disassemble and wash first, leave caps off, and steam for 2 to 3 minutes. If you or your kit call for extra caution, use boiling, dishwasher sanitizing, or sterilizer bags instead.
Start a simple care routine today. Sterilize regularly, replace worn parts, and follow the kit maker’s instructions to keep nasal rinsing safe and effective. If this guide helped, try the method and share your results, or leave a question below.

Appliance Review Expert
Lucas Ramirez is a trusted voice at HomeFixGrid.com, known for his clear, practical, and creatively written guides that simplify appliance care for everyday homeowners. With a strong focus on hands-on testing and real-world problem-solving, Lucas brings expert insight into appliance reviews and troubleshooting techniques. Her work empowers readers to confidently maintain, repair, and choose the right appliances for their homes.