How To Adjust Refrigerator Door To Close: Easy Fixes
Adjust the leveling legs, hinge screws, or door gasket to restore a refrigerator door’s proper seal.
A refrigerator door that will not close wastes energy, lets cold air escape, and may spoil food. Knowing how to adjust refrigerator door to close starts with finding the real cause, such as an uneven floor, overloaded shelves, loose hinges, or a damaged gasket. This guide explains safe, simple fixes and shows when a repair needs professional help.
Why Your Refrigerator Door Will Not Close
A refrigerator door may stay open for several different reasons. The most common cause is poor leveling. If the cabinet leans forward, gravity can pull the door away from the frame instead of helping it shut.
Food containers can also block the door. Large bottles, crowded shelves, or a crisper drawer that is not fully pushed in can stop the door by only a few inches. Even a small obstruction can prevent the magnetic gasket from sealing.
Other common causes include:
• Loose or worn hinge screws
• A bent hinge or door bracket
• A twisted refrigerator cabinet
• A dirty, folded, or damaged door gasket
• An overloaded door shelf
• Ice buildup around the frame
• A refrigerator that is not sitting level
The best way to learn how to adjust refrigerator door to close is to inspect these causes in order. Start with simple checks before turning any adjustment screw.

Tools and Safety Checks Before You Begin
Most refrigerator door adjustments require only a few basic tools. Check the owner’s manual first, because hinge covers and screw locations vary by brand and model.
You may need:
• A Phillips screwdriver
• A flathead screwdriver
• A 1/4-inch or 5/16-inch nut driver
• An adjustable wrench
• A small level
• A clean cloth
• Warm water and mild dish soap
• A helper for heavy doors
Unplug the refrigerator before working near electrical parts or removing large panels. You usually do not need to unplug the appliance for a quick hinge adjustment, but disconnecting power is the safer choice when the work is more involved.
Remove heavy items from the door before adjusting it. A full door can be surprisingly heavy, and its weight may hide a hinge problem. If you need to lift or remove the door, ask another adult to help.
Do not force the door into position. A refrigerator door can look sturdy, but its plastic liner, hinge bracket, and cam can crack under pressure. Slow, small adjustments are safer and more accurate.

Check the Refrigerator’s Level
Leveling is often the fastest answer to how to adjust refrigerator door to close. Most refrigerators are designed to sit slightly higher in the front than in the back. This small tilt helps the doors swing shut by themselves.
Place a level on the top of the refrigerator cabinet. Check it from side to side and from front to back. Do not rely only on the kitchen floor, since floors can slope even when they look flat.
Most models have adjustable front legs or rollers behind the lower grille. The exact design differs, but the basic process is similar:
-
Remove the lower grille if it blocks the leveling feet.
-
Find the adjustment bolt or foot near the front corner.
-
Turn the adjustment clockwise to raise that corner.
-
Turn it counterclockwise to lower that corner.
-
Adjust both sides in small turns.
-
Check the level again after each adjustment.
Open the door about halfway, then let it go. A correctly leveled refrigerator door should move toward the closed position without slamming. If the door swings wide open or stays in place, adjust the front legs again.
Do not raise one corner too far. A large tilt can make shelves uneven, cause bottles to roll, and put extra stress on the compressor area. The goal is a slight rearward tilt, not a steep slope.

Inspect and Clean the Door Gasket
The door gasket is the soft rubber seal around the edge of the door. It works like a flexible frame that holds cold air inside. If the gasket is dirty, folded, loose, or torn, adjusting the hinges may not solve the problem.
Clean the gasket with warm water and mild dish soap. Wipe the matching surface on the refrigerator cabinet as well. Avoid bleach, strong solvents, abrasive powders, and sharp tools. These products can dry out or cut the rubber.
Inspect the gasket for:
• Tears or holes
• Flattened sections
• Loose corners
• Twisted areas
• Gaps between the gasket and cabinet
• Food residue or hardened spills
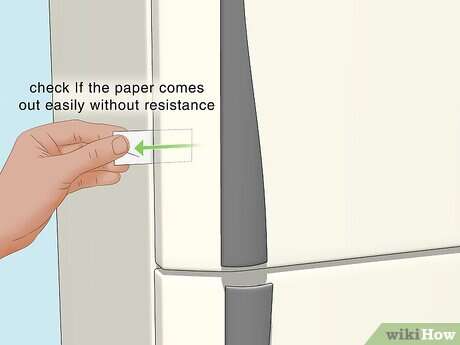
A simple paper test can help. Close the door on a strip of paper, then pull it gently. You should feel light resistance around the seal. Repeat this test at the top, bottom, and both sides. A loose spot may point to a gasket or alignment problem.
If the gasket is slightly bent, warm it with a hair dryer on its lowest setting. Keep the dryer moving and several inches away from the rubber. Gently shape the gasket by hand, then let it cool while the door remains closed.
Never overheat the gasket. High heat can warp the plastic door liner or permanently deform the seal. Replace the gasket if it is torn, brittle, or unable to hold a seal after cleaning and reshaping.

Remove Items That Block the Door
Before changing hardware, empty the door shelves and check the inside of the refrigerator. Many “door adjustment” problems are caused by one container in the wrong place.
Look for:
• Tall bottles touching the upper shelf
• Drawers that are not fully closed
• Food packages sticking beyond the shelf edge
• Ice or frost around the door frame
• A shelf that has shifted out of its track
• Door bins loaded beyond their design limit
A heavy door can sag slightly over time. Gallon jugs, glass jars, and large drink containers create leverage on the lower hinge. Move heavy items to the main refrigerator shelves and place lighter items in the door.
Close the door slowly while watching the gasket. If one corner touches first and another corner leaves a gap, the door may need alignment. If the door stops before touching the cabinet, something is likely blocking it.
This basic check is important when learning how to adjust refrigerator door to close because it prevents unnecessary repairs. I have seen people tighten every hinge screw when the real problem was a crisper drawer left open by less than an inch.
Adjust Loose Refrigerator Door Hinges
If the door is visibly sagging, loose hinge screws may be the cause. You may notice that the top corner sits lower than the cabinet opening or that the gasket does not line up with the frame.
Many refrigerators have a top hinge beneath a plastic cover. Remove the cover carefully. Some covers use screws, while others snap into place. Do not pry hard, since older plastic covers can become brittle.
Support the door while you loosen the hinge bolts. Tighten each bolt evenly, but do not fully tighten one bolt while the others remain loose. Small movements can change the door position.
Use this general method:
-
Open the door and support its weight.
-
Loosen the hinge bolts slightly.
-
Lift or lower the door until the top and side gaps look even.
-
Hold the door in position.
-
Tighten the bolts evenly.
-
Close the door and test the seal.
-
Repeat with small corrections if needed.
Some models use a hinge adjustment screw that raises or lowers the door without loosening the entire hinge. Turn it only a small amount at a time. One-quarter turn can make a visible difference.
Do not remove hinge bolts completely unless the manual specifically explains how to remove the door. A door can drop suddenly and damage the water line, wiring, hinge, or floor.

Align French-Door and Bottom-Freezer Models
French-door and bottom-freezer refrigerators often need a slightly different approach. Each upper door may have its own hinge, adjustment screw, and locking nut. The doors should meet evenly in the center and sit at the same height.
Start by checking whether one door is higher than the other. Many models have an adjustment screw under the hinge cover. Loosen the locking nut, turn the adjustment screw, and retighten the nut when the height is correct.
Watch the center gap as you adjust. The doors should meet without rubbing. The center flap on some French-door models must also fold and unfold freely. If it catches, the door may be misaligned or the flap may be damaged.
Bottom-freezer drawers can create a different problem. If the freezer drawer is not square with the cabinet, it may prevent the upper refrigerator doors from sealing correctly. Check the drawer rails, rear clips, and food packages before adjusting the upper hinges.
Because door designs differ, the manufacturer’s service instructions are especially useful for these models. The adjustment method for one brand may not fit another brand, even when the doors look similar.

Test the Door Seal After Adjustment
After you adjust the door, test it in more than one position. Open it halfway and release it. It should move toward the cabinet and close without needing a push.
Next, close the door and inspect the gasket all the way around. Look for a continuous contact line. No section should have a visible gap, fold, or loose corner.
Use these checks:
• Perform the paper test around the full gasket.
• Listen for air leaks or unusual fan noise.
• Check whether the interior light turns off.
• Confirm that the door does not bounce back open.
• Make sure shelves and drawers still move freely.
• Watch for frost or moisture near the gasket over the next day.
A refrigerator may need several hours to return to its normal temperature after the door has been left open. Do not judge cooling performance immediately after the adjustment. For food safety, keep the refrigerator at 40°F or below and the freezer at 0°F, as recommended by food safety guidance.
If the door closes but frost quickly returns around one section, the seal is still not correct. Frost is a useful warning sign because warm, moist air may be entering through a gap.
Common Mistakes to Avoid
A few shortcuts can create larger problems. The most common mistake is tightening screws without first checking the door contents, leveling legs, and gasket.
Avoid these errors:
• Do not force a sagging door upward by hand.
• Do not use cooking oil or petroleum jelly on the gasket.
• Do not spray cleaner directly into hinge openings.
• Do not overfill door bins.
• Do not use a heat gun on the gasket.
• Do not remove the door alone.
• Do not ignore a cracked hinge bracket.
• Do not keep operating the refrigerator if the door cannot seal.
In my experience, over-tightening is another frequent mistake. It can strip the screw threads or crack the plastic mounting area. Tighten hardware firmly, then stop. If the screw spins without becoming tight, the mounting hole may be damaged.
Another lesson is to mark the starting position of an adjustment screw with a small piece of removable tape. This gives you a reference point and makes it easier to return to the original position if the adjustment does not help.
When to Replace Parts or Call a Professional
A simple adjustment may not fix a door with structural damage. Contact a qualified appliance technician if you find a bent hinge, broken cam, cracked liner, damaged cabinet, or stripped mounting point.
Replace the gasket when it has deep cracks, tears, hard spots, or permanent gaps. A new gasket must match the exact refrigerator model. Universal seals may not fit well, even when their measurements seem close.
Professional help is wise when:
• The door drops when opened.
• The hinge area is cracked.
• A water tube or wire runs through the hinge.
• The refrigerator door has glass that is cracked or loose.
• The door still will not seal after leveling.
• The compressor runs almost constantly.
• Frost builds up heavily after the adjustment.
A door that does not seal can increase energy use and place extra demand on the cooling system. The exact energy impact depends on the room temperature, door gap, model, and how often the door opens. Still, fixing the seal is usually worthwhile for both food quality and appliance life.
How to Adjust Refrigerator Door to Close: A Simple Order of Operations
Use this sequence when you want the safest and fastest repair:
-
Remove anything that blocks the door.
-
Check that drawers and shelves are fully seated.
-
Clean the gasket and cabinet contact area.
-
Inspect the gasket for folds, tears, and gaps.
-
Check the refrigerator’s front-to-back level.
-
Adjust the front leveling legs or rollers.
-
Inspect the hinges for loose screws or sagging.
-
Adjust the hinge position in small steps.
-
Close the door and perform the paper test.
-
Monitor the refrigerator for frost, moisture, or warm food.
This order saves time because it starts with simple causes and moves toward hardware repairs. It also reduces the risk of damaging a hinge or door liner.
When I troubleshoot a refrigerator, I avoid making more than one major change at a time. If you adjust the legs, hinge, and gasket all at once, you may not know which change fixed the problem.
Frequently Asked Questions About How to Adjust Refrigerator Door to Close
Why does my refrigerator door keep popping open?
The refrigerator may lean forward, or an item may be blocking the door. Check the leveling legs, door shelves, drawers, and gasket before adjusting the hinges.
How do I make my refrigerator door close by itself?
Raise the front leveling legs slightly so the refrigerator tilts a little toward the back. Test the door after each small adjustment, since too much tilt can cause other problems.
Can I adjust a refrigerator door without removing it?
Yes, many doors can be aligned by loosening hinge bolts or turning an adjustment screw while the door remains installed. Support the door and follow the model’s instructions to prevent hinge damage.
How do I know if my refrigerator gasket needs replacement?
A gasket may need replacement if it is torn, brittle, badly flattened, or unable to hold paper firmly around the door. Persistent frost or moisture near one area can also indicate a poor seal.
Why is one refrigerator door higher than the other?
The door may have shifted because of hinge wear, loose bolts, an uneven cabinet, or heavy door contents. Many French-door models include a height adjustment screw under the hinge cover.
Is it safe to use a hair dryer on a refrigerator door seal?
A hair dryer can gently warm and reshape a slightly folded gasket when used on low heat and kept moving. Never use high heat, a heat gun, or direct heat for a long time.
What should I do if the door still will not close after leveling?
Check for a damaged gasket, bent hinge, broken hinge cam, blocked drawer, or cracked mounting area. If the problem remains, stop forcing the door and arrange an appliance inspection.
Conclusion
Learning how to adjust refrigerator door to close usually starts with simple steps: remove obstructions, clean the gasket, level the cabinet, and inspect the hinges. Make small changes, test the seal, and avoid forcing the door or over-tightening hardware.
A properly closing door protects food, reduces cold-air loss, and helps the refrigerator work as designed. Try the checks in order, and consult the model manual or a qualified technician when you find structural damage. If this guide helped, explore more appliance repair tips or share your results in the comments.

Appliance Review Expert
Lucas Ramirez is a trusted voice at HomeFixGrid.com, known for his clear, practical, and creatively written guides that simplify appliance care for everyday homeowners. With a strong focus on hands-on testing and real-world problem-solving, Lucas brings expert insight into appliance reviews and troubleshooting techniques. Her work empowers readers to confidently maintain, repair, and choose the right appliances for their homes.