
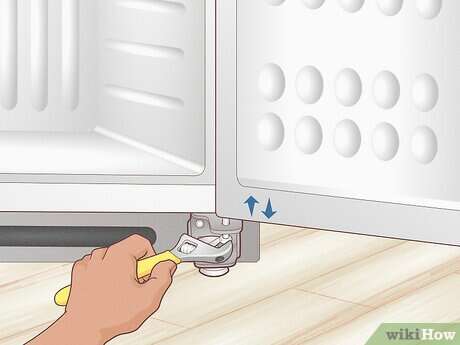
How To Level Refrigerator Doors: Easy DIY Guide
Level refrigerator doors by adjusting the bottom hinge, leveling the cabinet, and checking the door gap and seal.
A refrigerator door that sits too high, rubs, or will not close can waste energy and strain the door gasket. I have found that the fix is often simple, but the right adjustment depends on the refrigerator design. This guide explains how to level refrigerator doors safely, with clear steps, tool tips, common mistakes, and checks that help the door close and seal as it should.

Why refrigerator doors become uneven
Refrigerator doors can shift for several reasons. The cabinet may sit on an uneven floor, the adjustable feet may be set too high or too low, or the door hinge may loosen over time. Heavy door bins can also add weight to one side.
Some new refrigerators look uneven because the cabinet is slightly tilted backward by design. This small tilt helps the doors swing shut. However, the doors should still line up, open smoothly, and form an even seal around the frame.
Common signs that your refrigerator doors need adjustment include:
• One door sits higher than the other.
• The top or bottom edges do not line up.
• A door rubs against the cabinet or the other door.
• The door swings open instead of closing by itself.
• The gasket has gaps or does not touch the frame.
• The refrigerator rocks when you push it gently.
A small height difference may be normal on some models. Always check the owner’s manual before turning a hinge adjustment screw, since the location and direction can vary.
Tools and supplies you may need
Most refrigerator door adjustments need only a few basic tools. Gather them before you start so you do not have to move the appliance more than once.
• A ¼-inch hex driver or nut driver
• A Phillips screwdriver
• A flat-head screwdriver, if your model uses one
• An adjustable wrench
• A level
• A flashlight
• A helper for large or French-door refrigerators
• A thin plastic shim, if the floor needs minor support
Do not use a power drill at high speed on hinge screws. A drill can strip the screw head or damage a plastic hinge cover. Use hand tools whenever possible, and apply slow, even pressure.
You may also need a soft cloth to protect the floor. If the refrigerator is built in or connected to a water line, avoid pulling it far from the wall. A short water tube can kink or leak when stretched.

Prepare the refrigerator before leveling the doors
Good preparation makes the adjustment easier and safer. Remove heavy items from the door shelves first. You usually do not need to empty the entire refrigerator, but reducing door weight can improve accuracy.
Unplugging the refrigerator is not always required for a small hinge adjustment. Still, disconnect power if you must remove electrical covers, work near wiring, or move the appliance far from the wall. Never pull on the power cord.
Follow these steps before you adjust the doors:
-
Close both doors and inspect the top edges.
-
Check whether the refrigerator rocks from side to side.
-
Place a level on the top of the cabinet from left to right.
-
Turn the level front to back and check the cabinet tilt.
-
Look at the gasket for folds, dirt, or gaps.
-
Remove the toe grille or lower hinge cover if it blocks the adjustment feet.
The cabinet should usually sit level from side to side. Many models should lean slightly toward the back, but the exact amount depends on the design. A level cabinet gives the door hinges a stable base, much like a square frame gives a window a smooth path.
How to level refrigerator doors step by step
The safest way to level refrigerator doors is to adjust the cabinet feet first, then adjust the door hinge if needed. Door alignment can change when you raise or lower one side of the cabinet.
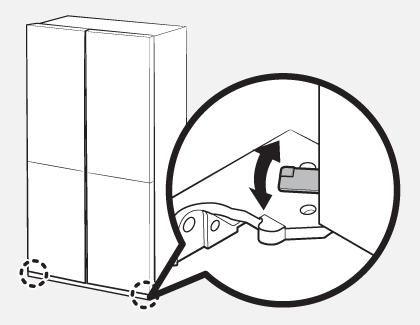
1. Find the leveling legs or rollers
Look below the refrigerator at the front corners. Some models have threaded leveling legs. Others use rollers with adjustment screws near the bottom front grille.
A clockwise turn often raises a leg, while a counterclockwise turn lowers it. This is common, but it is not universal. Check the manual if the screw does not move easily or if the door changes in the opposite direction.
2. Level the cabinet from side to side
Place the level on a flat part of the refrigerator top. Do not place it on a curved door or a decorative trim piece.
Adjust one front leg at a time until the bubble sits near the center. Open and close the doors during the process. The cabinet may move slightly as the weight shifts, so check the level again after each adjustment.
3. Create a slight backward tilt if the manual allows it
Many freestanding refrigerators work best when the front is a little higher than the back. This helps the door close under its own weight. The tilt should be small, not enough to make bottles or shelves look slanted.
Do not create a backward tilt if the manufacturer says the unit must be perfectly level. Built-in models, commercial units, and some smart refrigerators may have different requirements.
4. Compare the door height
Stand several feet away and look at the top edges. Then inspect the gap between the doors and the cabinet. A door that is low on the hinge side may need a hinge height adjustment.
For a single-door refrigerator, compare the door with the top and bottom of the cabinet. For a French-door model, compare the left and right doors with each other.
5. Loosen the hinge adjustment fastener
Many refrigerators use an adjustment screw or nut at the bottom hinge. Remove the hinge cover if needed. Support the door while you loosen the fastener slightly.
Do not remove the hinge bolts completely. The door is heavy, and a loose hinge can allow it to drop or twist. On a wide French-door model, have another person hold the door while you make the adjustment.
6. Raise or lower the door
Turn the adjustment screw in small steps. A quarter turn can make a visible difference. After each adjustment, close the door and compare the height again.
Some models use a spacer or adjustment ring instead of a screw. Add or remove only the parts listed in the manual. Do not use random washers, because they may change the hinge angle or reduce screw engagement.
7. Tighten the hinge and test the door
Hold the door in the correct position while tightening the fastener. The door should sit evenly without rubbing. Open it to several angles and let it go.
A properly adjusted door should move smoothly and close without force. If it swings wide open or stops before the gasket touches the frame, the cabinet tilt or hinge position may still need a small correction.
8. Check the door gasket
Clean the gasket and the contact surface with warm water and mild dish soap. Dry both surfaces before testing the seal. A dirty or folded gasket can look like a leveling problem.
Close the door on a sheet of paper. If you feel light resistance when pulling the paper out, the seal is likely making contact. Repeat the test at the top, middle, and bottom of the door.
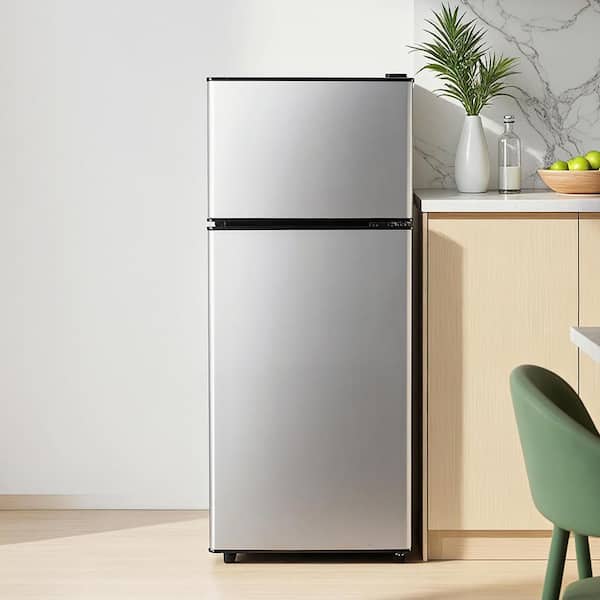
How to level French-door refrigerator doors
French-door refrigerators often have two separate adjustments. One adjustment changes the height of each door. Another may align the center gap or the lower edge.
Start by leveling the cabinet. Then compare the two doors at the top and center. If one door is higher, use the height adjustment on the lower hinge or hinge pin. Make small changes on one side, then recheck both doors.
Some French-door models include a fixed mullion that folds when the doors close. If this center flap does not move freely, the doors may appear uneven even when their height is correct. Check for food packages, shelf parts, or a damaged spring before changing the hinge.
For a refrigerator with a bottom freezer drawer, do not confuse drawer alignment with door leveling. The drawer front may use separate screws or clips. Adjust the refrigerator doors first, then align the drawer if needed.

How to level a side-by-side refrigerator
Side-by-side models usually have a vertical divider between the freezer and fresh-food sections. The doors should be close in height, but the cabinet may need a slight rearward tilt for proper closing.
Begin with the leveling rollers or legs under the front corners. If one door is low, adjust the corresponding hinge or height screw. Keep the center gap even from top to bottom.
Check that both gaskets touch the cabinet frame. A door can look level but still leak cold air if the gasket is twisted. Cold air loss can increase compressor run time and may lead to frost near the door.

Common mistakes to avoid
The most common mistake is adjusting the door before leveling the cabinet. This can make the door look correct for a moment, but the alignment may change when the appliance settles back on its feet.
Another mistake is turning the adjustment screw too far. Large changes can stress the hinge, pinch the gasket, or cause the door to strike nearby cabinets. Make small turns and check the result each time.
Avoid these errors:
• Do not force a stuck adjustment screw.
• Do not lift a heavy door by the handle.
• Do not remove hinge bolts without supporting the door.
• Do not place cardboard under a leveling leg unless the manufacturer permits it.
• Do not ignore a cracked hinge, bent bracket, or stripped screw.
• Do not use heat to reshape a damaged gasket.
In my experience, overloading the door shelves is another easy mistake. Gallon jugs, glass bottles, and large jars create leverage at the hinge. After leveling refrigerator doors, keep heavy items in the lower shelves when possible.

Troubleshooting after leveling refrigerator doors
If the door still will not close, inspect the gasket first. Look for a section that is folded inward or pulled away from the liner. Warm water can soften a slightly distorted gasket, but a torn or hardened gasket usually needs replacement.
If the refrigerator rocks, the feet are not firmly touching the floor. Adjust them until the unit is stable, then lock any leveling nuts if your model has them. A rocking cabinet can make the doors drift out of alignment again.
If the door is level but rubs, check nearby parts. A shelf, drawer, hinge cover, or food package may be blocking the path. Also inspect whether the refrigerator is too close to a wall or cabinet.
If the door drops again after adjustment, the hinge may be worn. A loose hinge pin, damaged bushing, or bent bracket needs repair rather than more adjustment. Continuing to tighten the screw may hide the problem and cause further damage.
Call a qualified appliance technician when:
• The hinge is cracked or bent.
• The door has dropped suddenly.
• A water line or wire harness is damaged.
• The appliance cannot be made stable.
• The cabinet is badly twisted.
• The door gasket still leaks after correct alignment.
How proper door leveling protects performance
Level refrigerator doors help the gasket maintain steady contact with the cabinet. A strong seal keeps warm room air out and helps the refrigerator maintain a stable temperature.
The U.S. Food and Drug Administration recommends keeping a refrigerator at or below 40°F and a freezer at 0°F. A poor door seal can make temperature control harder, especially in a warm kitchen or when the door is opened often.
Door alignment also protects the hinge and door liner. When a door drags or must be lifted to close, the hinge receives extra stress. Correct leveling reduces that strain and makes daily use easier.
Still, door leveling cannot solve every cooling issue. A refrigerator with a blocked vent, failed fan, weak compressor, or faulty control may need a different repair. Use a refrigerator thermometer if you suspect a temperature problem.

When to replace the door gasket
A gasket may need replacement if it is torn, brittle, loose, or permanently flattened. Small wrinkles can sometimes relax after cleaning and careful warming, but do not use a heat gun or high heat. Excessive heat can deform the gasket or damage the plastic liner.
Check the gasket at all four corners. Close the door on paper in several places. If the paper slides out with no resistance in one area, the gasket may not be sealing there.
Install the correct gasket made for your refrigerator model. Universal seals may not fit the door channel or corner shape. After replacement, allow the gasket to settle according to the manufacturer’s instructions, then recheck the door alignment.
A simple maintenance routine
Level refrigerator doors once, then inspect them during normal cleaning. Look at the top edges, center gap, and gasket each month. Early correction is easier than fixing a door after the hinge has worn.
Use these habits to keep the doors aligned:
• Keep heavy containers out of the door when possible.
• Clean the gasket with mild soap and water.
• Keep shelves and bins fully seated.
• Do not lean on an open door.
• Check the cabinet after moving the refrigerator.
• Confirm that the appliance does not rock.
In one common repair situation, a homeowner thought the door hinge had failed. The real cause was a tall bottle blocking the door and forcing it upward each time it closed. Removing the bottle and leveling the front feet solved the problem without replacing a part.
Frequently Asked Questions About How to Level Refrigerator Doors
How do I know if my refrigerator door needs leveling?
Look for uneven top edges, rubbing, a door that swings open, or gaps around the gasket. A refrigerator that rocks or has doors that do not close by themselves may also need leveling.
Do I level the refrigerator or the doors first?
Level the refrigerator cabinet first. Once the cabinet is stable, adjust the individual door height or hinge position if the doors still do not line up.
Should a refrigerator lean forward or backward?
Many refrigerators should lean slightly backward so the doors close more easily. The correct amount varies, so follow the owner’s manual and avoid a strong tilt.
Can I level refrigerator doors without unplugging the appliance?
Small adjustments often do not require unplugging the refrigerator. Disconnect power if you must remove electrical covers, work near wiring, or move the unit far from the wall.
Why is one refrigerator door still higher after adjustment?
The cabinet may still be uneven, or the door hinge may need a separate height adjustment. Check the leveling feet, hinge fastener, and door gasket before making another small adjustment.
How long does it take to level refrigerator doors?
A basic adjustment often takes 15 to 30 minutes. Extra time may be needed if the refrigerator has a water line, a bottom freezer drawer, damaged hardware, or a badly uneven floor.
When should I call an appliance technician?
Call a technician if the hinge is bent, the door drops, the cabinet will not become stable, or the gasket will not seal after correct alignment. These signs may point to worn or damaged parts.
Conclusion
Level refrigerator doors by stabilizing the cabinet, setting a small rearward tilt when approved, and making careful hinge adjustments. Use small turns, keep the door supported, and test the gasket at several points before you finish.
A properly aligned door should close smoothly, stay sealed, and sit evenly with the cabinet and adjoining door. Take a few minutes to check your refrigerator today, and share your results or explore more appliance repair guides for the next fix.

Appliance Review Expert
Lucas Ramirez is a trusted voice at HomeFixGrid.com, known for his clear, practical, and creatively written guides that simplify appliance care for everyday homeowners. With a strong focus on hands-on testing and real-world problem-solving, Lucas brings expert insight into appliance reviews and troubleshooting techniques. Her work empowers readers to confidently maintain, repair, and choose the right appliances for their homes.